Touch free disinfection dispenser
The system switches a valve to dispense a mist of disinfection as depicted below
The system is called Seb@Sterr
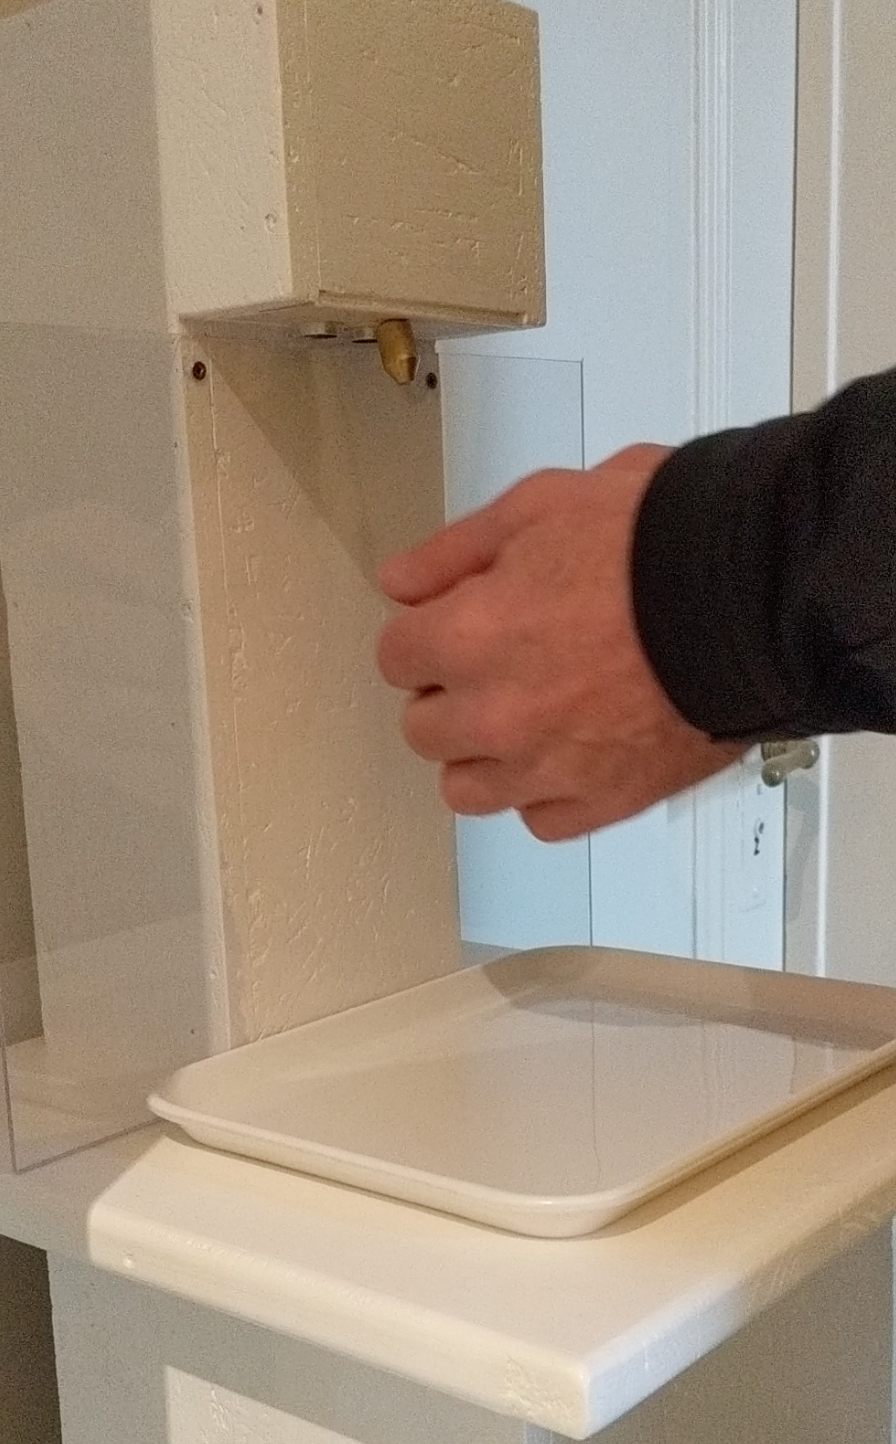
The Seb@Sterr in action, just hold your hands below the nozzle and the desinfaction spray comes out of the nozzle for about 0.5s, long enough to have covered both hands completly.
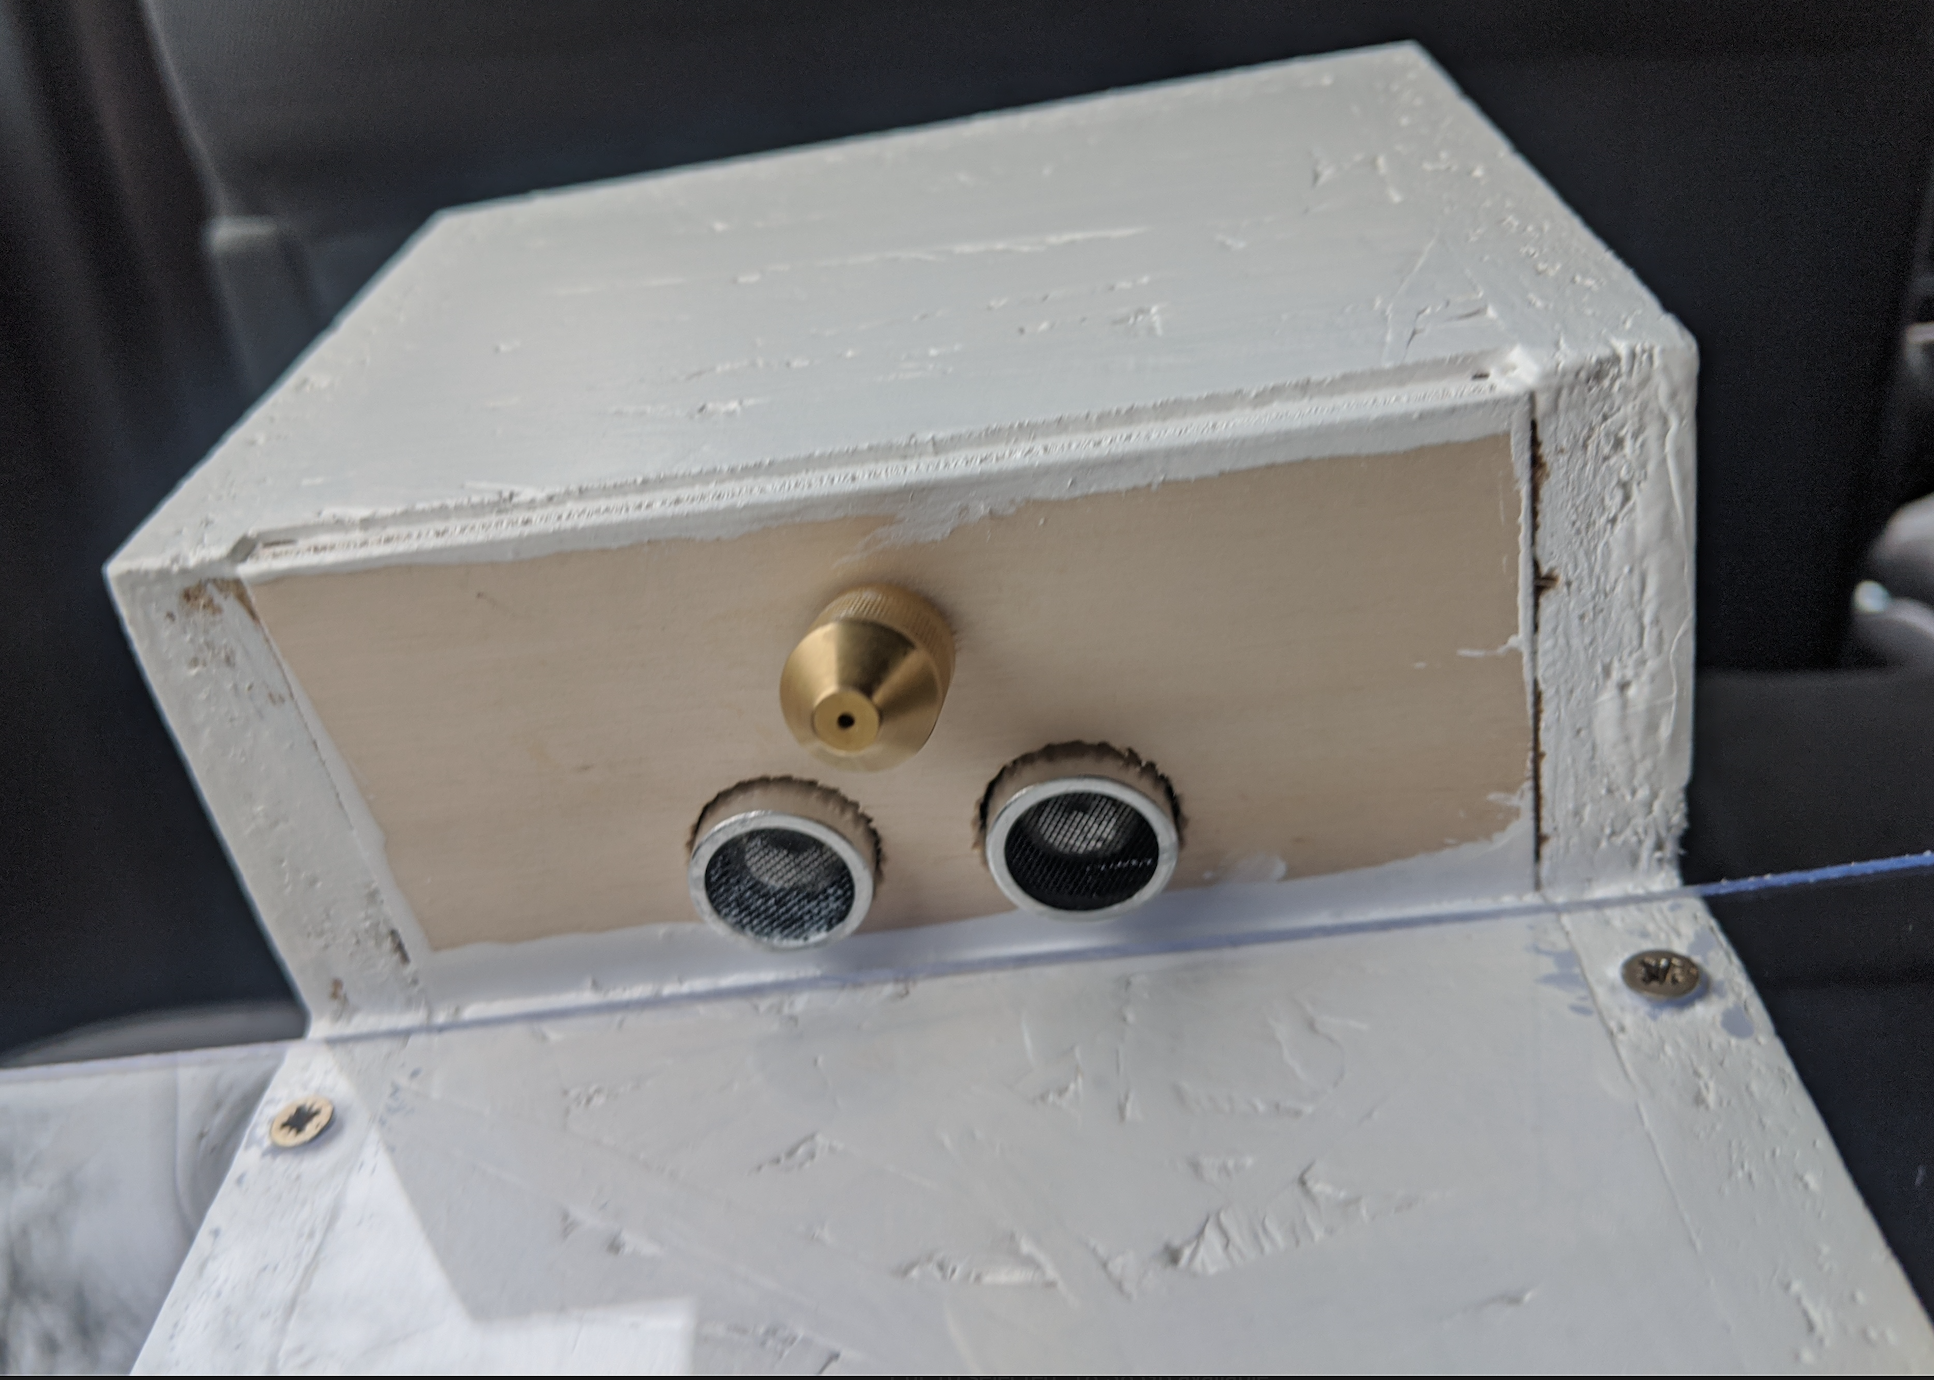
The ultrasonic sensor is locate next to the nozzle as shown below, so the system is only activated when something is close than 10cm to the sensor.
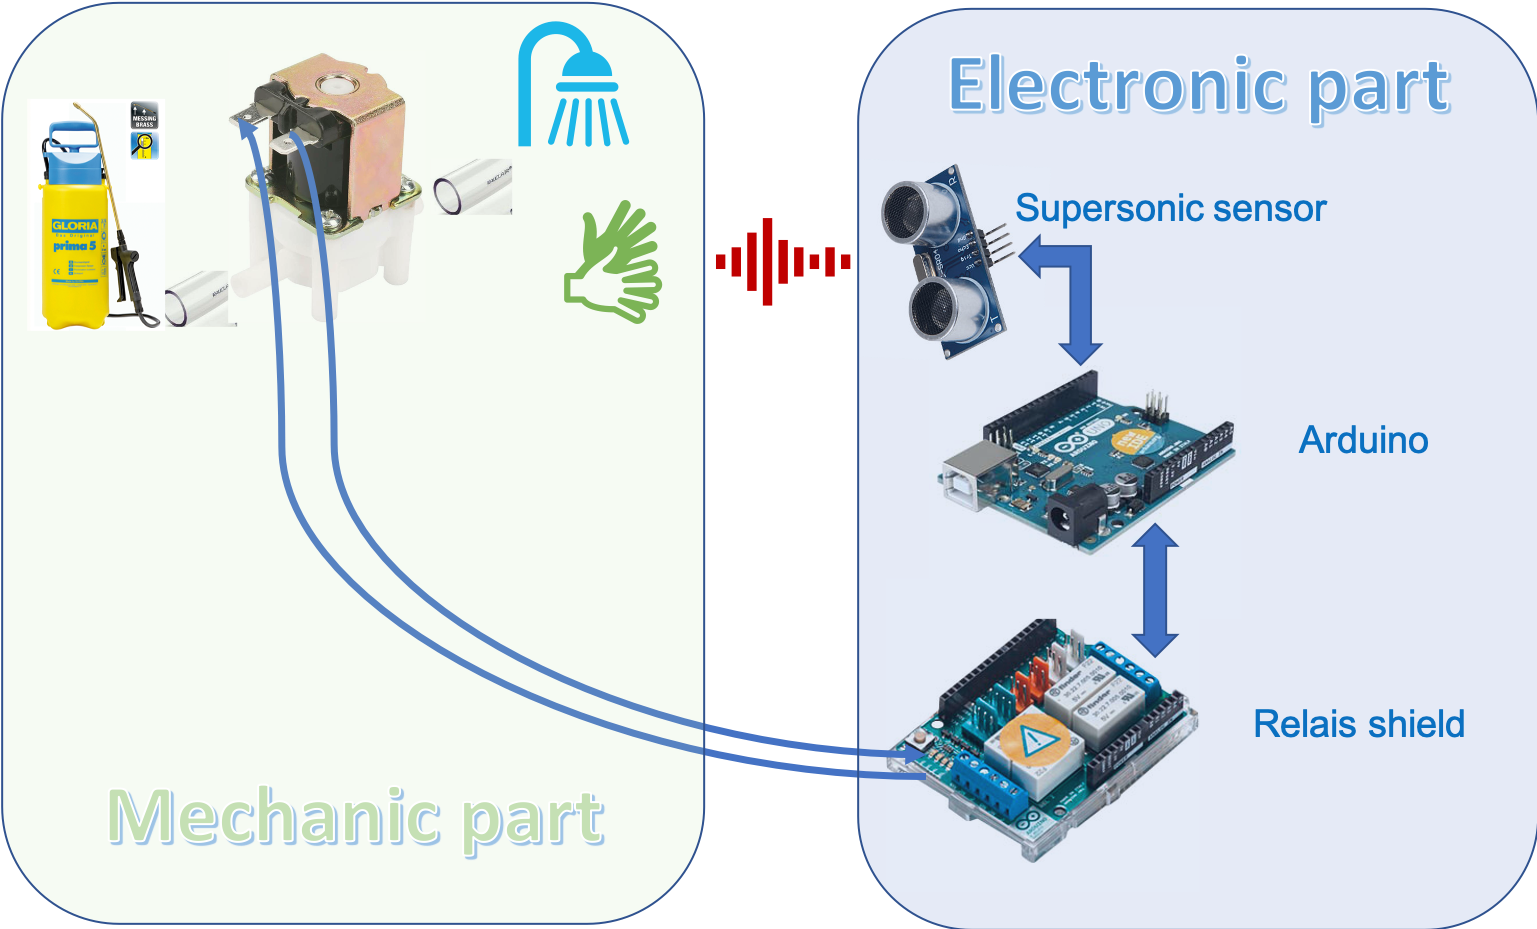
A logical overview of the system is given below
Parts list
The needed hardware is:
- ARDUINO UNO
- ARD SHD 4 RELAIS
- Power supply
- tube 5m
- valve
- freewheeling diode
1,5KE 15A TVS-Diode - ultrasonic sensor
- wires
- pressure tank

Wiring
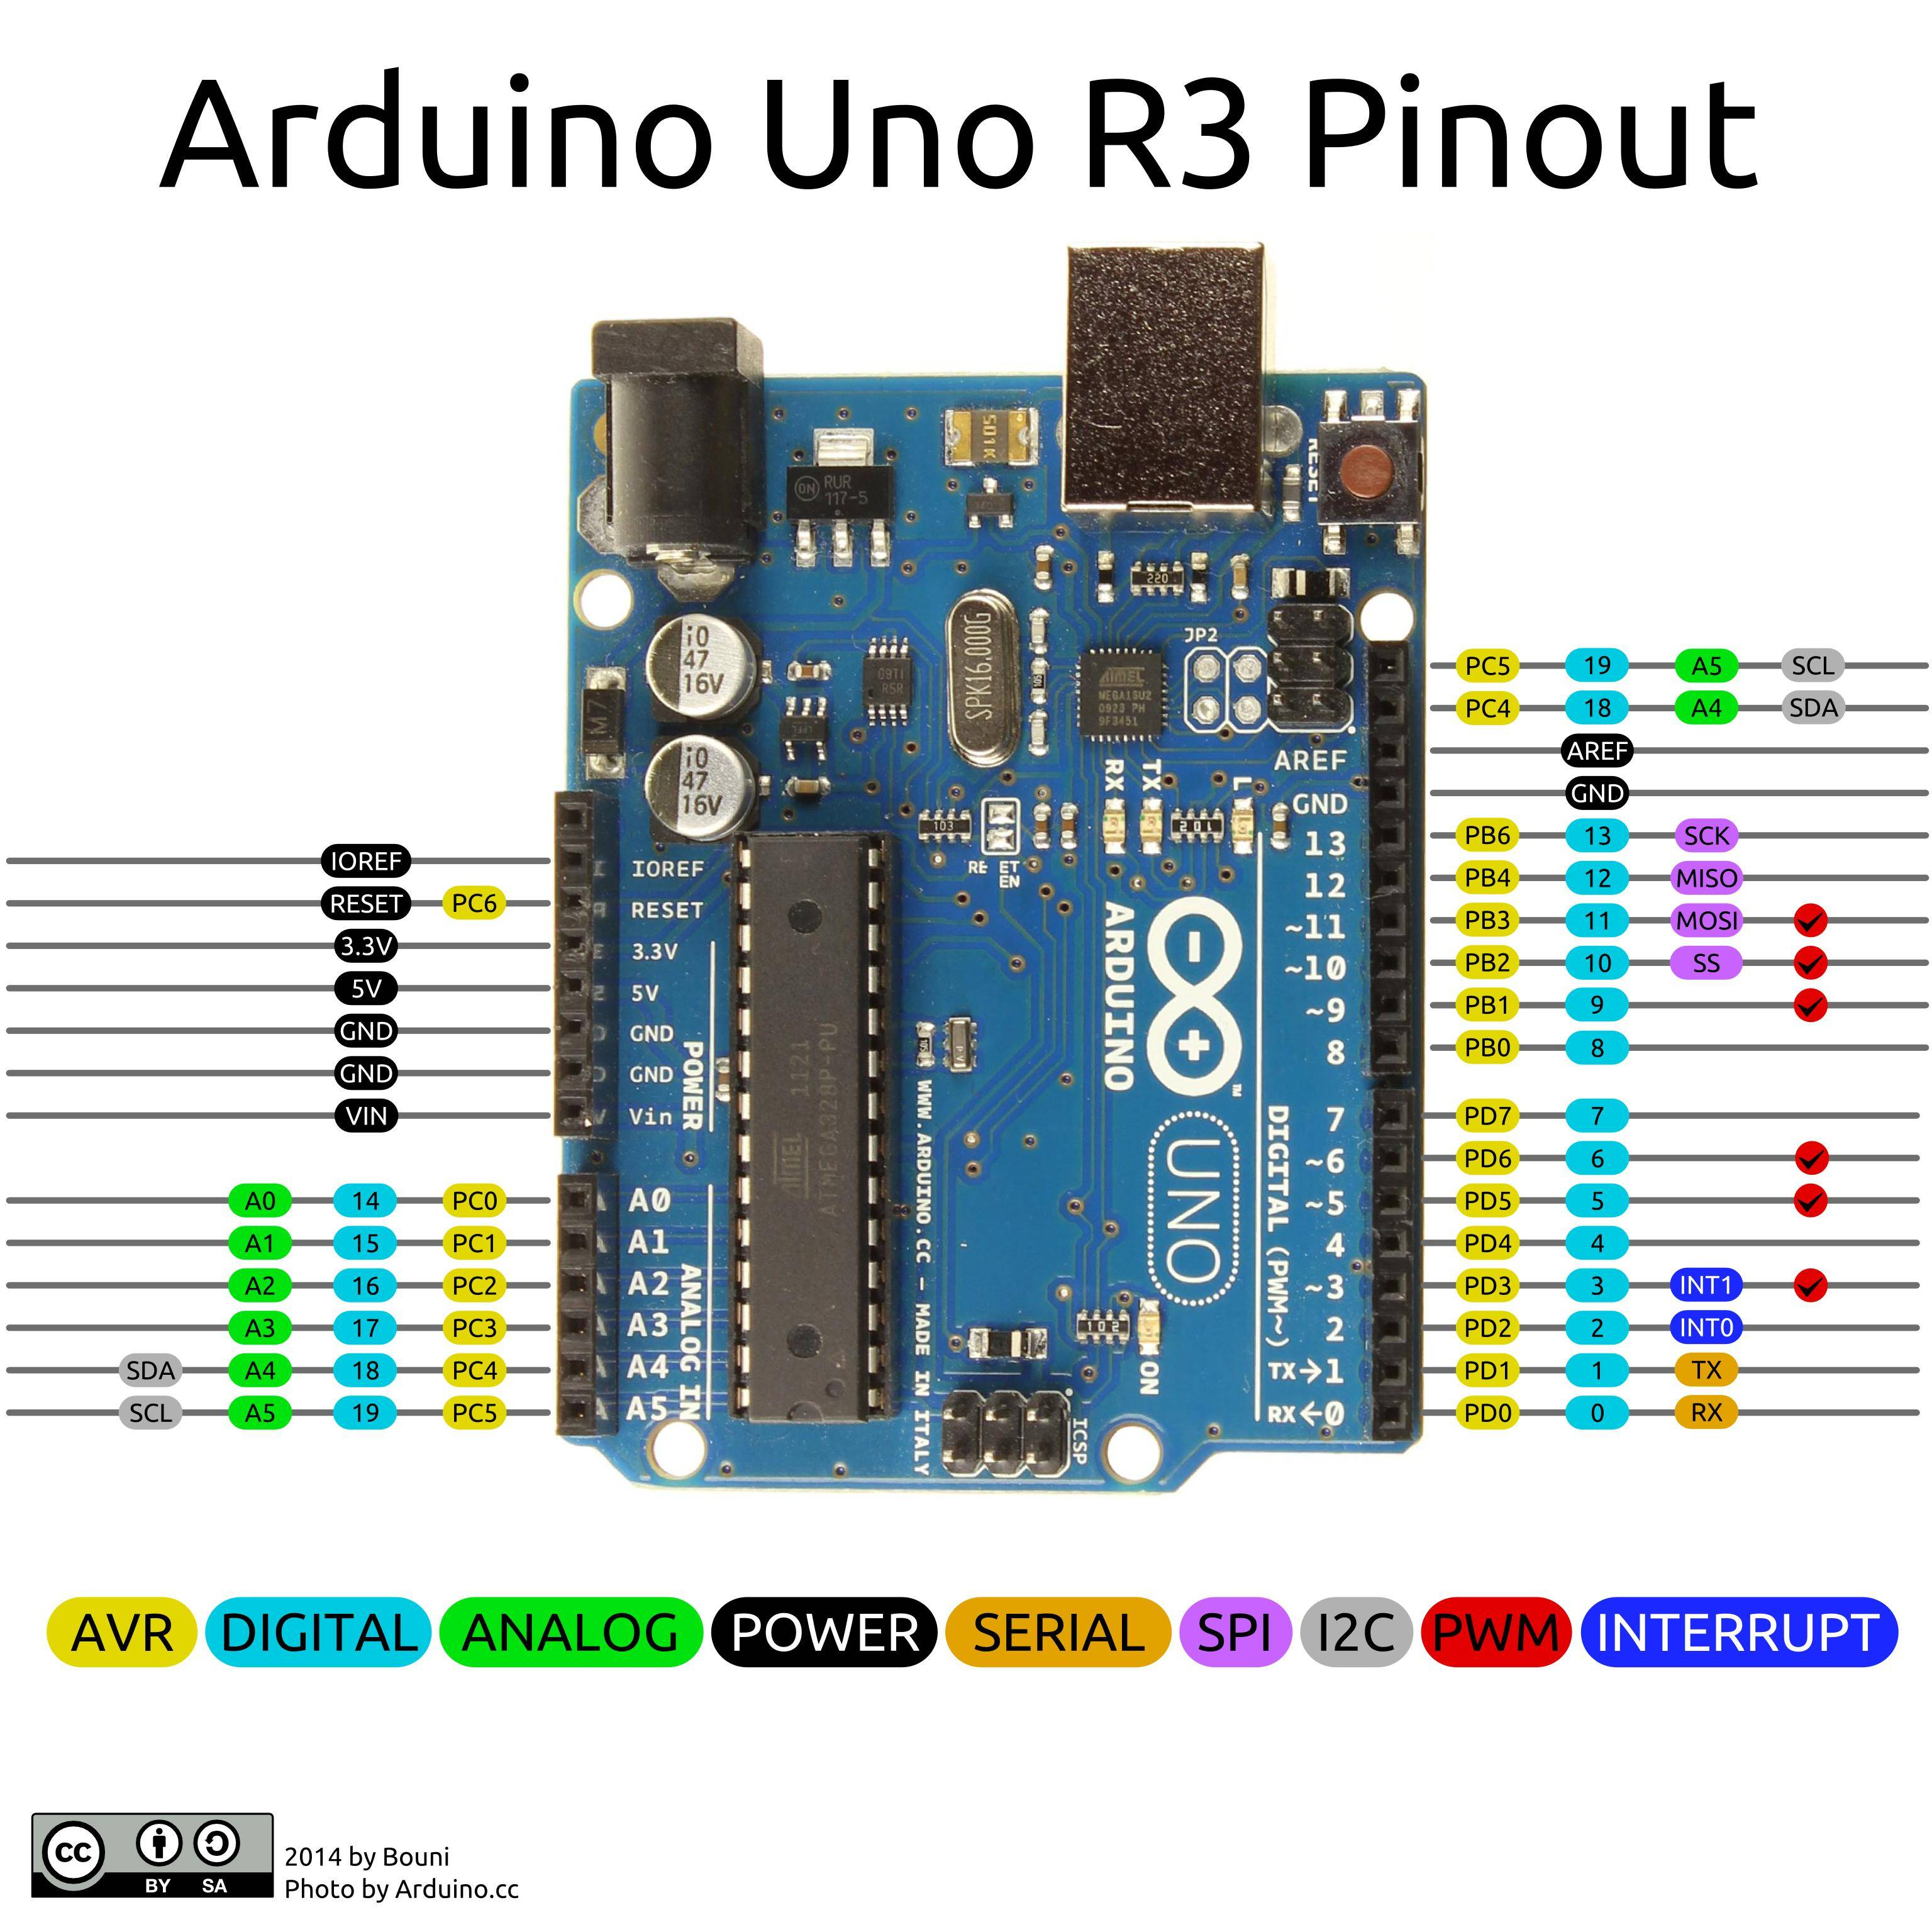
The pin out of the relais shield is:
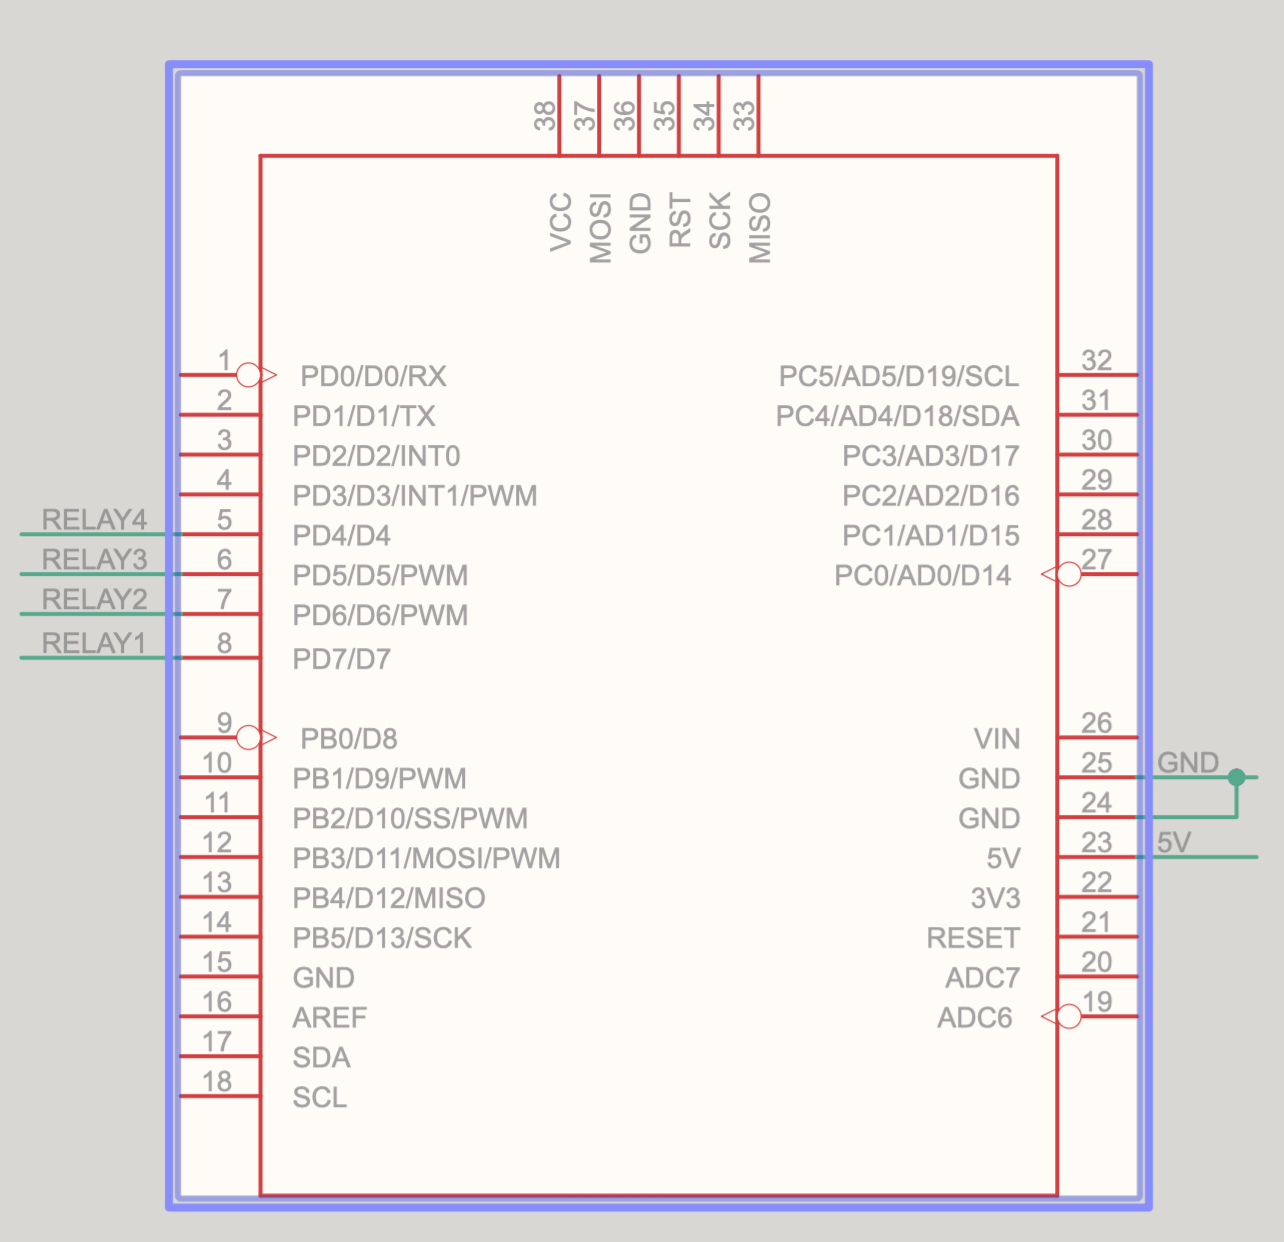
The pin out of the Arduino is Arduino Pins 4, 5, 6, and 7 control relays 4, 3, 2, and 1 respectively. Therefore the ultrasonic sensor will be on pin 8 and 9
#define Echo_EingangsPin 9 // Echo Eingangs-Pin
#define Trigger_AusgangsPin 8 // Trigger Ausgangs-Pin
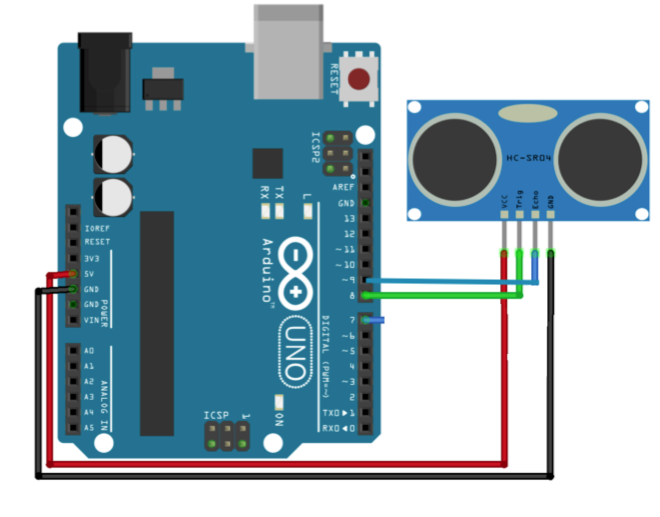
The sensor is connected to the Arduino as follows with a small modification:
The pin out of the Arduino is Arduino Pins 4, 5, 6, and 7 control relays 4, 3, 2, and 1 respectively. Therefore the ultrasonic sensor will be on pin 8 and 9
Software
The software will be run on the Arduino, a working listing is below
// pins for relais shield
int RelayControl1 = 7;


// pins for ultra sonic sensor
#define Echo_EingangsPin 9 // Echo Eingangs-Pin
#define Trigger_AusgangsPin 8 // Trigger Ausgangs-Pin


// variables for ultra sonice sensor are defined
int maximumRange = 100;
int minimumRange = 2;
long Abstand;
long threshold = 10;
int sprayDuration = 10e3;
int noRepeatTime = 1e3;
int makeSureNoFalseAlarm =300;
int readInterval = 200; // intervall in ms of sensor reading
long Dauer;


void setup() {
  // put your setup code here, to run once:
  Serial.begin(9600);// setup Serial Monitor to display information
  pinMode(RelayControl1, OUTPUT);// connected to Relay 1
  pinMode(Trigger_AusgangsPin, OUTPUT);
  pinMode(Echo_EingangsPin, INPUT);
  Serial.begin (9600);

}

void loop() {
  // put your main code here, to run repeatedly:
  digitalWrite(Trigger_AusgangsPin, HIGH);
  delayMicroseconds(10);
  digitalWrite(Trigger_AusgangsPin, LOW);
  // Nun wird am Echo-Eingang gewartet, bis das Signal aktiviert wurde // und danach die Zeit gemessen, wie lang es aktiviert bleibt
  Dauer = pulseIn(Echo_EingangsPin, HIGH);
  // Nun wird der Abstand mittels der aufgenommenen Zeit berechnet
  Abstand = Dauer / 58.2;
  // Überprüfung ob gemessener Wert innerhalb der zulässingen Entfernung liegt
  if (Abstand >= maximumRange || Abstand <= minimumRange) {
    // Falls nicht wird eine Fehlermeldung ausgegeben.
    Serial.println("Abstand ausserhalb des Messbereichs");
    Serial.println("-----------------------------------");
  }
  else {
    // Der berechnete Abstand wird in der seriellen Ausgabe ausgegeben
    Serial.print("Der Abstand betraegt:");
    Serial.print(Abstand);
    Serial.println("cm");
    Serial.println("-----------------------------------");
    if (Abstand < threshold) {
      delay(makeSureNoFalseAlarm);  // make sure that is no fluke
      if (Abstand < threshold) {
        digitalWrite(RelayControl1, HIGH); // turn relay 2 ON
        Serial.println(" relay 2 ON");

        delay(sprayDuration); // spray for duration sprayDuration

        digitalWrite(RelayControl1, LOW); // turn relay 2 OFF
        Serial.println(" relay 2 OFF");
        delay(noRepeatTime);  // wait for noRepeatTime before next spray
      }
    }
  }
  delay(readInterval);

}
Software for relais shield
A code snippet for the relais shield
#define relay1 7

void setup() {

  Serial.begin(9600);// setup Serial Monitor to display information
  pinMode(relay1, OUTPUT);// connected to Relay 1

}

void loop() {

  digitalWrite(relay1,HIGH);// turn relay 3 ON
      Serial.println(" relay 3 ON");

}
Software for supersonic sensor
A example code listing is given in https://cdn-reichelt.de/documents/datenblatt/A300/SEN-US01-ANLEITUNG.pdf
#define Echo_EingangsPin 7 // Echo Eingangs-Pin
#define Trigger_AusgangsPin 8 // Trigger Ausgangs-Pin
// Benoetigte Variablen werden definiert
int maximumRange = 300;
int minimumRange = 2;
long Abstand;
long Dauer;
void setup() {
 pinMode(Trigger_AusgangsPin, OUTPUT);
 pinMode(Echo_EingangsPin, INPUT);
 Serial.begin (9600);
}
void loop() {
// Abstandsmessung wird mittels des 10us langen Triggersignals gestartet digitalWrite(Trigger_AusgangsPin, HIGH);
delayMicroseconds(10);
digitalWrite(Trigger_AusgangsPin, LOW);
// Nun wird am Echo-Eingang gewartet, bis das Signal aktiviert wurde // und danach die Zeit gemessen, wie lang es aktiviert bleibt
Dauer = pulseIn(Echo_EingangsPin, HIGH);
 // Nun wird der Abstand mittels der aufgenommenen Zeit berechnet
Abstand = Dauer/58.2;
// Überprüfung ob gemessener Wert innerhalb der zulässingen Entfernung liegt
if (Abstand >= maximumRange || Abstand <= minimumRange) {
    // Falls nicht wird eine Fehlermeldung ausgegeben.
      Serial.println("Abstand ausserhalb des Messbereichs");
      Serial.println("-----------------------------------");
 }


else {
// Der berechnete Abstand wird in der seriellen Ausgabe ausgegeben
      Serial.print("Der Abstand betraegt:");
      Serial.print(Abstand);
      Serial.println("cm");
      Serial.println("-----------------------------------");
}
 delay(500);
}